Easy Core Data CSV Exporter in Swift

A new app I’m working on has a Core Data back end and I wanted to implement a quick way to export all the entities into a CSV file and dump it into the Desktop. 

Here are the snippets to do it:

1. Make sure you get the NSObjects you want to export (in this case I use a function that will return an array with the fetched NSObjectSubclass Transaction)

   private func provideAllTransactions() -> Array<Transaction>{

        let fetchRequest = NSFetchRequest(entityName: “Transaction”)

        fetchRequest.sortDescriptors = [NSSortDescriptor(key: “date”, ascending: false), NSSortDescriptor(key: “concept”, ascending: true)]

        return try! managedObjectContext.executeFetchRequest(fetchRequest) as! Array<Transaction>

    }

2. Convert to text, properly separating by commas and lines

    private func convertTransactionsToCsvString(transactions: Array<Transaction>)->String{

        var result = “HEADER 1, HEADER 2, HEADER 3, \r”//Headers


        for transactionIterator in transactions{ //Data

            result = result + “\”” + (transactionIterator.accountItBelongsTo?.name)! + “\”” + “,”

            result = result + “\”” + ((transactionIterator.date)?.description)! ?? NSDate().description

            result = result + “\”” + “,” + “\”” + (transactionIterator.concept)! + “\””

            result = result + “\”” + “\r”

        }


        return result

    }

3. Save to a path 

    func exportAllToCsv() -> Bool{


        let contentsToWrite = convertTransactionsToCsvString(provideAllTransactions())


        //Select path

        let path = “/Users/USER_NAME/Desktop/csvTest.csv”

        //Try to save it

        do {

            try contentsToWrite.writeToFile(path, atomically: true, encoding: NSUTF8StringEncoding)

        }catch{

            print(“ERROR: Export could not be saved in %”, path)

        }


        return true


    }

Note that in this example the path is hardcoded to the desktop of the user named USER_NAME, you should have the user choose where he wants to save it or you can hardcode a location in your disk. 

If you would have a NSDictionary it would be almost the same but starting at point 2 with the dictionary results. 

Questions / comments? I’m at @MarcMasVi

Marc


PS. Here is how you would have the path be selected by the user:        


    privatefunc userToChooseAFileInModalPannel() -> String?{

        let pannel: NSOpenPanel = NSOpenPanel()

        pannel.canChooseDirectories = true

        pannel.canChooseFiles = false

        pannel.allowsMultipleSelection = false

        pannel.runModal()


        return pannel.URL?.path

    }

 then in point 3 you would do 

//Select path

        let path = userToChooseAFileInModalPannel() + “/test.csv”
Back to coding!

You may have noticed a steep drop in post frequency this last couple of months. The reason is that I just got married and well… I code and write this blog on my spare time and, with planning and all, have not had much of that this last months. 

Should be back to normal in a weeks time! I’m enjoying a lot the honey moon, but damn it I also miss coding!

Is it too late for me to be saved? 

Working with localized numbers – NSNumberFormatter Swift 2

In my case, I’m working on a csv importer and I wanted to get from the system the decimal and thousand delimiters. 

This is the way I do it, a workaround sure but works great:

var thousandDelimiter = NSNumberFormatter.localizedStringFromNumber(NSNumber(double: 1234), numberStyle: NSNumberFormatterStyle.DecimalStyle)


thousandDelimiter = thousandDelimiter.substringWithRange(thousandDelimiter.startIndex.advancedBy(1)…thousandDelimiter.startIndex.advancedBy(1))


var commaDelimiter = NSNumberFormatter.localizedStringFromNumber(NSNumber(double: 1.02), numberStyle: NSNumberFormatterStyle.DecimalStyle)


commaDelimiter = commaDelimiter.substringWithRange(commaDelimiter.startIndex.advancedBy(1)…commaDelimiter.startIndex.advancedBy(1))


Again, documentation in this case is quite good, find more here

Marc

Surviving in the App Store

Great article on the challenges of a small company in the App Store. Must read:

http://www.theverge.com/2016/3/2/11140928/app-store-economy-apple-android-pixite-bankruptcy


Marc

Using NSValueTransformers (Value Transformer) Swift 2.0

So here’s a tricky one, on my upcoming app I sometimes use View-Based TableViews.

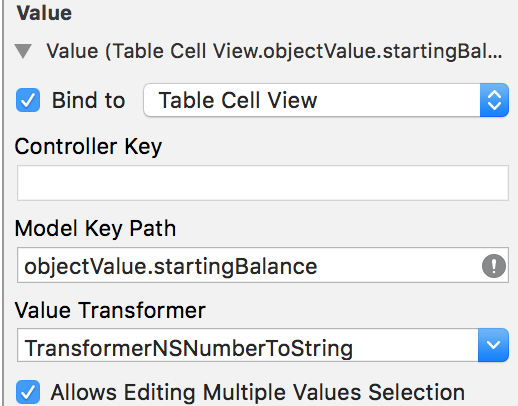
Mostly, it works like magic, but sometimes you need to use a Value Transformer in the binding to allow the table to understand how to display something. In this example, I needed to convert a NSNumber to a String (and back!). Here’s how you do it:

1. Create a NSValueTransformer subclass (here’s mine for your reference):

import Cocoa


class TransformerNSNumberToString: NSValueTransformer {


    override class func transformedValueClass() -> AnyClass { //What do I transform

        return NSNumber.self

    }


    override class func allowsReverseTransformation() -> Bool { //Can I transform back?

        returntrue

    }


    override func transformedValue(value: AnyObject?) -> AnyObject? { //Perform transformation

        guard let type = value as? NSNumber else { return nil }

        return type.stringValue


    }


    override func reverseTransformedValue(value: AnyObject?) -> AnyObject? { //Revert transformation

        guard let type = value as? NSString else { return nil }

        return NSNumber(double: type.doubleValue)

    }

}

2. In the App Delegate, in my case I put it inside applicationDidFinishLaunching you add (yes, it’s weird but true!):

func applicationDidFinishLaunching(aNotification: NSNotification) {

        NSValueTransformer.setValueTransformer(TransformerNSNumberToString(), forName: “TransformerNSNumberToString”) //

    }

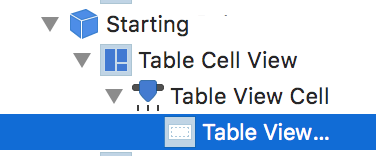
3. In the binding you add the Value Transformer needed!

Screen Shot 2016 02 07 at 21 32 28

Screen Shot 2016 02 07 at 21 32 36


That’s it! A great post explaining this in more detail is NSHipster, it’s the best source I found out there apart from Apple docs. 

Questions / comments? I’m at @MarcMasVi

Marc

3 Steps to fetch in Core Data (Swift)

1. Get the managed context:

    let managedObjectContext = (NSApplication.sharedApplication().delegate as! AppDelegate).managedObjectContext!

//Change AppDelegate for the name of the class of your Application Delegate


2. Set a variable to store the data:

    var contentsOfTransactionFetchRequest = []

3. Fetch the data you need

        let fetchRequest = NSFetchRequest(entityName: “Whatever”)

        contentsOfTransactionFetchRequest = try! managedObjectContext.executeFetchRequest(fetchRequest)

Hope it helps, for me it’s good to have it summarized for later reference!

If you have any feedback I’m at @MarcMasVi

Marc

Working with NSUserDefaults in Swift 2

I was quite pleased to see than in Swift is even easier than in Objective-C. Here is how you do it:

Create a variable that can access them: 


    var userDefaults = NSUserDefaults.standardUserDefaults()


Add values to dictionary:


    userDefaults.setObject(“StringText”, forKey: “KeyInDictionary”)


Read values from dictionary:


    let textuserDefaults.objectForKey(“KeyInDictionary”) as! String


And that’s in a very simple way how it works. If you want to get into it deeper you can look into the documentation or read this great post


If you have any feedback I’m at @MarcMasVi

Marc

Mouse Down (NSEvent in Swift 2)

As I continue adding features for my upcoming app I’m starting to work with NSEvents to add actions to user interaction. I’ve been amazed at how fast is to do this in Swift. 

For instance, detecting where the user presses a button in your window, and then converting it to the coordinate system of a view is extremely easy. Just type the following within your NSView class:

override func mouseDown(theEvent : NSEvent) {

        Swift.print(“Original: \(theEvent.locationInWindow)”)

        let convertedPoint = self.convertPoint(theEvent.locationInWindow, fromView: theEvent.window?.contentView)

        Swift.print(“Tuned: \(convertedPoint)”)


    }

Easy as pie!

Feedback, send it @MarcMasVi on Twitter. 


Switching NSViewControllers from NSWindowController

This has taken quite some time to crack as there was not that much available information online. 

I wanted a very simple way to change the NSViewController of a window on the fly by using code. 

Screen Shot 2015 12 07 at 18 41 33

The solution I ended up with is quite easy, on the NSWindowController I load the default NSViewController by typing in windowDidLoad():

let viewController = storyboard?.instantiateControllerWithIdentifier(“nsviewcontroller1″) as! NSViewController

        self.window?.contentViewController = viewController

Afterwards, when I want to change NSViewController1 by NSViewController2 i just have a button in my toolbar linked to the following action:

@IBAction func showController2(sender: NSToolbarItem){

        let viewController = storyboard?.instantiateControllerWithIdentifier(nsviewcontroller2) as! NSViewController

        self.window?.contentViewController = viewController

    }

That’s about it, extremely simple, but took me quite a bit to develop. 

As always if you have any feedback I’m at @MarcMasVi


Marc