Synchronizing Main and Background Core Data Threads (Swift 3)

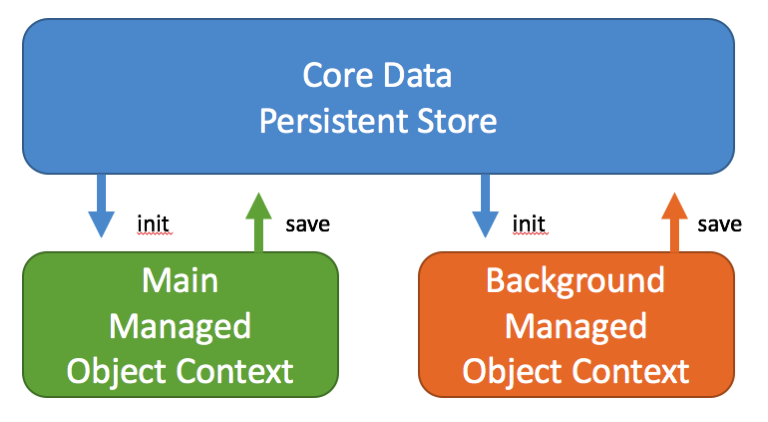
Let’s say we have two different managedObjectContext (with one persistentStoreCoordinator). 

The first one is used across the app for most quick fetches:

var mainManagedObjectContext = NSManagedObjectContext(concurrencyType: NSManagedObjectContextConcurrencyType.mainQueueConcurrencyType)


        mainManagedObjectContext.persistentStoreCoordinator = coordinator


And the second, running in the background, for the queries that take a long time:

var backgroundManagedObjectContext = NSManagedObjectContext(concurrencyType: NSManagedObjectContextConcurrencyType.privateQueueConcurrencyType)

        backgroundManagedObjectContext.persistentStoreCoordinator = coordinator


When they are initialized both contain the same data. However once changes are applied to one of them -in this example the main- like adding, changing or deleting rows, the other will not know -in this example the background/private one-.
 

Screen Shot 2016 11 27 at 13 19 12


Therefore if we add objects to the main managedObjectContext, when we fetch the backgroundManagedObjectContext we will not get them. 

How do we fix this? Well first we have to save the changes of the objectContext that was modified. We do so by adding once we’ve finalized the changes:

       //Commit changes

        do {

            try managedObjectContext.save()

        }catch{

            print(“ERROR: Cound not save Core Data”)

        }


At this point we have saved the changes in the Persistent Store. We still have to ask the backgroundObjectContext to get them from the persistent store thought. For that we will use the automatic notification “NSManagedObjectContextDidSave”.

In the class where the backgroundThread is contained we will add an observer for the notification (note that we’re passing as object the context that was modified):

//Handle changes in core data for background thread

        NotificationCenter.default.addObserver(self, selector: #selector(AppDelegate.handleMainCoreDataChangeInBackgroundManagedContext(notification:)), name: NSNotification.Name.NSManagedObjectContextDidSave, object: managedObjectContext)

    }

And then we will add the function that will syncronize the backgroundThread, in this example: 

func handleMainCoreDataChangeInBackgroundManagedContext(notification: Notification){

        managedObjectContextBackgroundThread?.mergeChanges(fromContextDidSave: notification)

    }

That’s it! Now when you query the background thread you’ll get the same information as you have in the main one. 

You can read more about NSManagedObjectContext in Apple Docs


Questions / comments? I’m at @MarcMasVi 


Marc


Note: using two contexts is very powerful when used in combination with dispatchqueues

       DispatchQueue.global().async {

            //Query here in background context & save if applicable

            DispatchQueue.main.async {

                //Refresh UI & query main context & save if applicable

            }

        }


Are we (NSViewController view) the First Responder?

In some cases a class may want to know if it’s the first responder before triggering an action.

For instance if several loaded View Controller classes are listening for the same notification, how can they know which one should trigger the action? Well… they should ask their view. 

In this case a NSTableView class is asking if it’s currently the first responder:

        if (self.view.window?.firstResponder == self.tableView){

            triggerFunctionHere()

        }

And that’s it 🙂

Questions / comments? I’m at @MarcMasVi 

Marc

Undo functionality in Core Data (Swift 3)

If you’re developing a Core Data based application for Mac, wouldn’t it be great if you could add undo support?

Well, turns out that is a couple of lines away. Follow the simple steps:

1. Make sure your managedObjectContext has an undo manager, without it Core Data can’t keep track of the changes:

         managedObjectContext?.undoManager = UndoManager() 

2. In the viewController where you should handle the undo operation just add:

      func undo(_ sender: AnyObject?){


        coreDataHelper.managedObjectContext.undoManager?.undo()


        refreshTable() //If applicable (for instance if you don’t use bindings)

        re-fetch the information and reload the table. This is what this

        function does in my code


      }

And that’s it, now you have full undo functionality! You’ll see how in the menus Undo no longer appears greyed out.

Questions / comments? I’m at @MarcMasVi 

Marc

Sorting Multi Dimensional Array (Swift 3)

Hello all, 

This one I’ve found specially useful when working with Core Data fetched arrays. 

Let’s say that we want to sort the result of a fetch request based on the value of the field “gold”, we would therefore do the following:

let dwarfGoldBags = … //Contains the result of a fetch request with one of the fields named “gold” and being an integer.


We will now proceed to sort the array and store it in sortedGoldArray:

let sortedGoldArray = dwarfGoldBags.sorted { ($0.goldas Int) > ($1.goldas Int) } 


If instead of core data you have a multi-dimensional array it would be as easy as:

let sortArray = originalArray.sorted { ($0.[0] as Int) > ($1.[0] as Int) } 


In this case we’re comparing the values stored in the first value of the subArrays. 

Questions / comments? I’m at @MarcMasVi 

Marc

Dates & Components in Swift 3.0

The way we work with dates has changed in Swift 3, the change makes it’s way simpler then before. Let’s look at an example:

//CreateDateFromComponents (1st January 2017)

            var newDate = Date()

            let newDateComponents = DateComponents(calendar: Calendar.current, timeZone: nil, era: nil, year: 2017, month: 1, day: 1, hour: nil, minute: nil, second: nil, nanosecond: nil, weekday: nil, weekdayOrdinal: nil, quarter: nil, weekOfMonth: nil, weekOfYear: nil, yearForWeekOfYear: nil)

            newDate = Calendar.current.date(from: newDateComponents)!


Hope this proves useful. If you would have any suggestions on how to improve you know where to reach me, @MarcMasVi in Twitter.


Marc


Testing launch experience for a Mac app

In iOS it’s quite easy, you just delete the app and all of it’s data is removed as well. But how do you do it in OSX? Well, you should remove:

~/Library/Application Support/<YOUR OSX APP BUNDLE NAME>/

for example, by default should be:

~/Library/Application Support/com.yourcompany.yourapp/

And this is it! I suggest you do a Project -> Clean Build folder (to see this option you will have to press Alt while in the Porject menu) afterwards, just to be sure. 

Questions / comments? I’m at @MarcMasVi 

Marc


Scheduled notifications in macOS

Notifications are a very useful addition to macOS applications, when done right can help inmensly. 

Here’s how you create scheduled and immediate notifications. Let’s start with the immediate ones:

func triggerNotification() -> Void {

    let notification = NSUserNotification()

    notification.title = “titleOfNotification”

    notification.informativeText = “whateverTextYou WantToAdd”

    notification.soundName = NSUserNotificationDefaultSoundName

    NSUserNotificationCenter.defaultUserNotificationCenter().deliverNotification(notification)

}

This will trigger a notification the moment you execute it, if however you would like to schedule a notification for a later date you can do:

func showNotification(atDate: NSDate) -> Void {

    let notification = NSUserNotification()

    notification.title = “It’s MONTH”

    notification.informativeText = “Time to check your finances!”

    notification.soundName = NSUserNotificationDefaultSoundName

    notification.deliveryDate = NSDate().dateByAddingTimeInterval(5.0)

    //notification.deliveryDate = getDateOfNextNotification()

    NSUserNotificationCenter.defaultUserNotificationCenter().scheduleNotification(notification)

}

In this case you would be showing the notification after 5 seconds, more useful though is to plan it for a later date, like you can see in my commented code. The getDateOfNextNotification function simply returns the NSDate where I would like the notification to trigger. 

If you plan to use this, for instance in App Delegate, you may want to check if you have already scheduled notification to avoid duplicates. You can do the following:

func scheduleUpcomingAlertNotification() -> Void {

    let pipeOfNotifications = NSUserNotificationCenter.defaultUserNotificationCenter().scheduledNotifications.count

    if( pipeOfNotifications > 0){

        return

    }else trigger the function

Questions / comments? I’m at @MarcMasVi 

Marc

Copy one or multiple NSTableView rows, Swift

So here’s a simple yet tricky one: you’ve created your NSTableView but now you would like to allow a user to copy to the clipboard one, or a couple of rows. How do you do it?

1. Implement the function copy (func copy(sender: AnyObject?){}), do not confuse with the method for duplicating an object

 2. Get the index set from the tableView selection and retrieve the relevant rows from your dataSource. From there is just a matter of composing the text to copy into the pasteboard. 

Here’s my code structure, implemented in my NSTableViewController:

func copy(sender: AnyObject?){


        var textToDisplayInPasteboard = “”

        let indexSet = tableView.selectedRowIndexes

        for (_, rowIndex) in indexSet.enumerate() {

            var iterator: CoreDataOjectType

            iterator=tableDataSource.objectAtIndex(rowIndex)

            textToDisplayInPasteboard = (iterator.name)! 

        }

        let pasteBoard = NSPasteboard.generalPasteboard()

        pasteBoard.clearContents()

        pasteBoard.setString(textToDisplayInPasteboard, forType:NSPasteboardTypeString)


    }

This will also automatically enable the Edit -> Copy (Command + C) menu, that would be disabled -grayed out- without this code. 

Questions / comments? I’m at @MarcMasVi 

Marc

Easy Core Data CSV Exporter in Swift

A new app I’m working on has a Core Data back end and I wanted to implement a quick way to export all the entities into a CSV file and dump it into the Desktop. 

Here are the snippets to do it:

1. Make sure you get the NSObjects you want to export (in this case I use a function that will return an array with the fetched NSObjectSubclass Transaction)

   private func provideAllTransactions() -> Array<Transaction>{

        let fetchRequest = NSFetchRequest(entityName: “Transaction”)

        fetchRequest.sortDescriptors = [NSSortDescriptor(key: “date”, ascending: false), NSSortDescriptor(key: “concept”, ascending: true)]

        return try! managedObjectContext.executeFetchRequest(fetchRequest) as! Array<Transaction>

    }

2. Convert to text, properly separating by commas and lines

    private func convertTransactionsToCsvString(transactions: Array<Transaction>)->String{

        var result = “HEADER 1, HEADER 2, HEADER 3, \r”//Headers


        for transactionIterator in transactions{ //Data

            result = result + “\”” + (transactionIterator.accountItBelongsTo?.name)! + “\”” + “,”

            result = result + “\”” + ((transactionIterator.date)?.description)! ?? NSDate().description

            result = result + “\”” + “,” + “\”” + (transactionIterator.concept)! + “\””

            result = result + “\”” + “\r”

        }


        return result

    }

3. Save to a path 

    func exportAllToCsv() -> Bool{


        let contentsToWrite = convertTransactionsToCsvString(provideAllTransactions())


        //Select path

        let path = “/Users/USER_NAME/Desktop/csvTest.csv”

        //Try to save it

        do {

            try contentsToWrite.writeToFile(path, atomically: true, encoding: NSUTF8StringEncoding)

        }catch{

            print(“ERROR: Export could not be saved in %”, path)

        }


        return true


    }

Note that in this example the path is hardcoded to the desktop of the user named USER_NAME, you should have the user choose where he wants to save it or you can hardcode a location in your disk. 

If you would have a NSDictionary it would be almost the same but starting at point 2 with the dictionary results. 

Questions / comments? I’m at @MarcMasVi

Marc


PS. Here is how you would have the path be selected by the user:        


    privatefunc userToChooseAFileInModalPannel() -> String?{

        let pannel: NSOpenPanel = NSOpenPanel()

        pannel.canChooseDirectories = true

        pannel.canChooseFiles = false

        pannel.allowsMultipleSelection = false

        pannel.runModal()


        return pannel.URL?.path

    }

 then in point 3 you would do 

//Select path

        let path = userToChooseAFileInModalPannel() + “/test.csv”