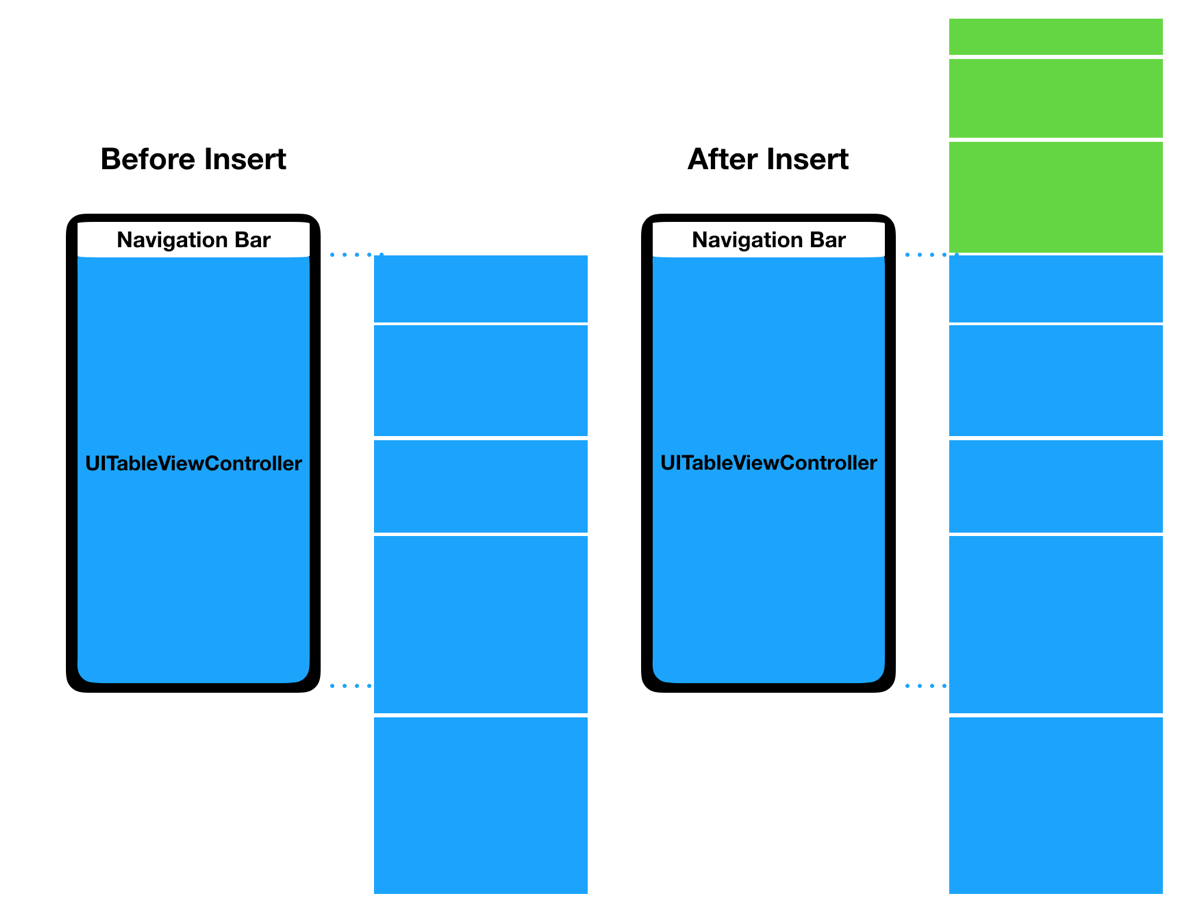
Inserting cells at the top of a UITableView with no scrolling

If you would like your table to be refreshed “ala Twitter”, with new data being added on top, here’s a quick an easy way to do it for iOS: 

func updateTableViewAfterAdditionInNewArray(){

        //Get new feeds and check if counts are different

        let countOfAddedItems = oldArray.count – newArray.count


        //If we’re adding information

        if (oldArray) > 0 {

            if debugMode == true{

                print(“We have a difference in counts of \(oldArray)”)

            }


            if oldArray.count != 0 {

                //Update data model

                oldArray = newArray


                var initialContentOffSet = tableView.contentOffset.y

                //If offset is less than 0 due to refresh up gesture, assume 0

                if initialContentOffSet < 0 {

                    initialContentOffSet = 0

                }

                //Reload, scroll and offset

                tableView.reloadData()

                tableView.scrollToRow(at: IndexPath(row: countOfAddedItems, section: 0), at: .top, animated: false)

                tableView.contentOffset.y = tableView.contentOffset.y  + initialContentOffSet

            }else{

                if debugMode == true{

                    print(“There was no data in oldArray, avoid scrolling. “)

                }

                //Update data model

                oldArray = newArray


                tableView.reloadData()

            }


        }


    }

Hope it helps! I’m really enjoying going back to iOS development, expect more iOS posts this next couple of months as I’m ramping up on my next project. 

Questions / comments / suggestions? I’m at @MarcMasVi 


Marc

Improve your ⌘ V efficiency

Want to improve your quality of life in 5 seconds?

1. Go to System Preferences

2. Keyboard

3. Shortcuts -> App Shortcuts

4. Click on add -> All Applications –> add “Paste and Match Style” for keyboard shortcut ⌘V

Thank you Ally

Marc

Multi Thread access to shared Variables – Swift 4 Concurrency

Working with background threads really helps improve the app responsiveness & the overall user experience. But, and it’s a big but, you have to be aware of multithread access conflicts. 

Screen Shot 2018 06 17 at 11 01 43 AM

If you access/modify the same variable from multiple threads you’re prone to non-reproducible -seemingly random- crashes.

How to Detect Conflicts?

To help you find where you may have this variable access conflicts you should enable Thread Sanitizer & Pause on issues in your Run Scheme settings. Xcode will highlight conflicts while the app runs, as it detects them. If you want to dig deeper in what the debugger can do for you there’s a great WWDC 2018 session worth watching

Screen Shot 2018 06 17 at 10 29 38 AM

Once we have detected the variables that are being accessed from different threads it’s time to strengthen them.

How to Address Multi-Thread Variable Access Conflicts?

We must protect the access to the variables so that no simultaneous read/write action can occur. The easiest way is to use accessors for the variable, accessors can be accessed from any thread but the value of the variable always will be fetched from one thread (that we create for this purpose). Here’s an example to illustrate:

    //Background queue to synchronize data access

    fileprivate let globalBackgroundSyncronizeDataQueue = DispatchQueue(

        label: globalBackgroundSyncronizeSharedData”)


    //Value variable (always accessed from created thread) 

    var arrayOfFeedItems_Value : [String] =  []


    //Variable accessor that can be accessed from anywhere (multithread-protected).

    var arrayOfFeedItems : [String] {

        set(newValue){

            globalBackgroundSyncronizeDataQueue.sync(){

                self.arrayOfFeedItems_Value = newValue

            }

        }

        get{

            return globalBackgroundSyncronizeDataQueue.sync{

                arrayOfFeedItems_Value

            }

        }


    }

In this case I’m adding multi-thread protection to an array (arrayOfFeedItems), but you could do the same with any variable. 

This has been a fun learning experience for me, hope this post helps other with the same challenges.

Questions / comments? I’m at @MarcMasVi 

Marc


Some extra documentation if you want to dig deeper: Swift Access Races & Framework Dispatch.

Random numbers in Swift

Swift 4.2 has introduced a native random number API in the standard library, making it cross platform. 

Int.random(in: 1...1000) // → 691
Double.random(in: 0..<1) // → 0.8741555749903935
UInt32.random(in: 0xD800...0xDFFF) // → 55666

Read more in the great article from Ole Begemann, worth a read


Marc

Resize NSImage Proportionally (Swift)

I wanted a simple function to resize an image to a desired height, while keeping proportions. Here’s what I came up with (based on Marco implementation):

extension NSImage {


    func resizedImageTo(sourceImage: NSImage, newSize: NSSize) -> NSImage?{

        if sourceImage.isValid == false {

            return nil

        }

        let representation = NSBitmapImageRep(bitmapDataPlanes: nil, pixelsWide: Int(newSize.width), pixelsHigh: Int(newSize.height), bitsPerSample: 8, samplesPerPixel: 4, hasAlpha: true, isPlanar: false, colorSpaceName: .calibratedRGB, bytesPerRow: 0, bitsPerPixel: 0)

        representation?.size = newSize


        NSGraphicsContext.saveGraphicsState()

        NSGraphicsContext.current = NSGraphicsContext.init(bitmapImageRep: representation!)

        sourceImage.draw(in: NSRect(x: 0, y: 0, width: newSize.width, height: newSize.height), from: NSZeroRect, operation: .copy, fraction: 1.0)

        NSGraphicsContext.restoreGraphicsState()


        let newImage = NSImage(size: newSize)

        newImage.addRepresentation(representation!)


        return newImage


    }


}

Questions / comments / suggestions? I’m at @MarcMasVi 

Marc

Updated after I discovered the great implementation Marco Arment suggested. 

NSWindow min and max size (Swift 4)

You can force the views to keep a inferred min and max width/height by using AutoLayout, but what if you’re working with several views simultaneously? Wouldn’t it be simpler to have a window min and max width/height? 

Just add the following in your NSWindowController:

override func windowDidLoad() {

        super.windowDidLoad()

        window?.minSize = NSSize(width: 410, height: 600 )

        window?.manSize = NSSize(width: 600, height: 1200

}


Questions / comments? I’m at @MarcMasVi 

Marc

NSImageView Aspect Fill

Setting an image to use AspectFill in iOS is trivial, you can set it by code or directly in storyboard. 

But how do you do it in macOS? In Cocoa/App Kit there is no property for that, you may scale it , but there is no option for AspectFill (or AspectFit for that matter). So, how do we do it?

Once you find the way is quite easy actually. We’ll create a subclass of NSImageView and we’ll override the image property, then, we’ll place the image in a CALayer; and finally we’ll use this CALayer to resize it with the desired AspectFill. 

import Cocoa


class ImageAspectFillView: NSImageView {


    override var image: NSImage? {

        set {

            self.layer = CALayer()

            self.layer?.contentsGravity = kCAGravityResizeAspectFill

            self.layer?.contents = newValue

            self.wantsLayer = true


            super.image = newValue

        }


        get {

            return super.image

        }

    }


}


And that’s it! I hope it helped, took me quite a while to find this solution but works like a charm. Questions, comments? I’m at @MarcMasVi


Marc

Open links in the Background

Here’s a quick tip on how to open a URL in the background or foreground depending on a user-set preference. 

if(openInBackgroundPreferenceSet == true){ 
                 NSWorkspace.shared.open([linkToOpen], withAppBundleIdentifier: nil, options: NSWorkspace.LaunchOptions.withoutActivation, additionalEventParamDescriptor: nil, launchIdentifiers: nil)
}else{
                 NSWorkspace.shared.open(linkToOpen)
}


Questions / comments? I’m at @MarcMasVi 


 Marc